Altenew Home Decor & Tag
Hello, I’m sharing something a bit different on the blog today. For my Level 2 AECP Challenge, I’ll be creating a home decor piece with a matching tag.
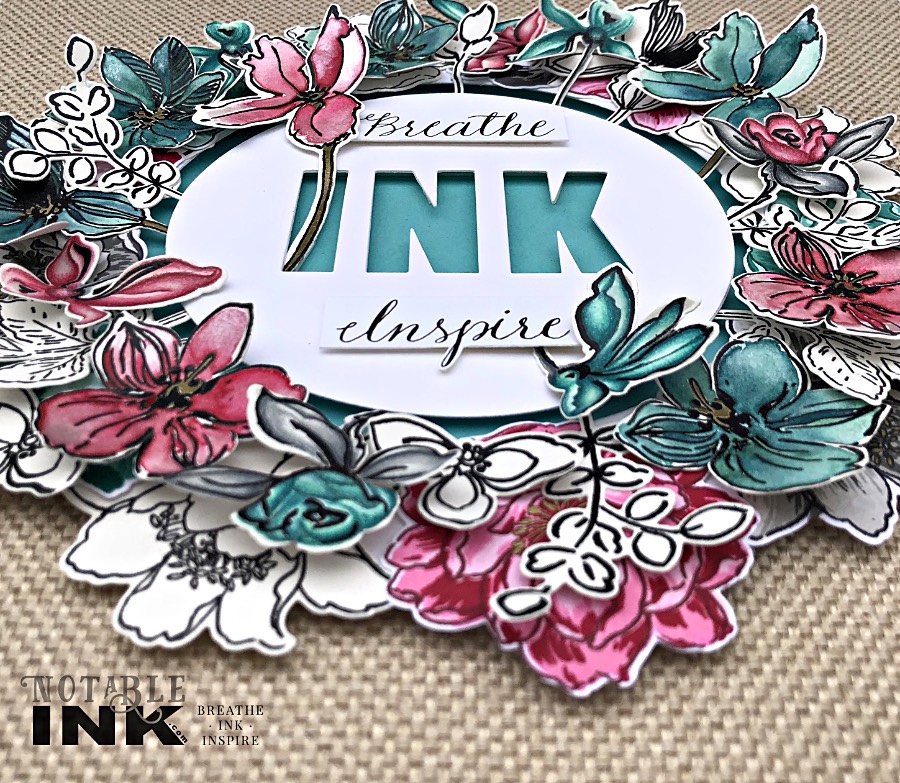
I decided to create a shadow box framed wreath featuring my tagline to hang in my craft area and am so pleased with how it turned out! This was a lengthy project so there are 2 video tutorials. Enjoy!

I started by creating all the flowers and leaves for the project. I used 3 mediums: color pencil, watercolor, and layer stamping. The color pencil and watercolor flowers were stamped on Fabriano Artistico Extra White Hot Press paper and the layer stamped flowers were done on Neenah Classic Crest Solar White 80 lb cardstock.
Tip: using paper with tooth or texture to it will give the color pencil more to grab onto. Watercolor paper or craft paper are good choices.
It took a few days to create all the flowers which kept me busy while I was waiting for my Altenew Caps Bold Alphabet Dies to arrive. Yay! Coloring of the flowers is covered in the Part 1 video, while the process of arranging the flowers is covered in video Part 2.
Prismacolor Pencils: Pink Flowers
Crimson Lake PC 925, Magenta PC930, Pink PC 929, Blush Pink PC 928, Deco Peach PC1013, and White PC 938
Prismacolor Pencils: Teal Flowers
Peacock Green PC907, Cobalt Turquoise PC 105, Parrot Green PC 1006, Light Green PC 920, Black PC 935, and White PC 938
Prismacolor Pencils: Leaves
Black PC 935, 70% Cool Grey PC 1065, 50% Cool Grey PC 1063, 20% Cool Grey PC 1060, and White PC 938
I created a circular frame with cardstock and die cut a circle with my largest die for the sentiment in the middle. INK was die cut from the circle. The circle was popped up on two layers of foam tape and backed with teal cardstock. The words Breathe and Inspire were written with pointed pen and popped up on 1 layer of foam tape.
Once the frame was complete, I stared to arrange and adhere the flowers starting with the layer stamped ones. To add greater dimension I cut deep into the petals and leaves to allow me to shape and bend the petals.

1 to 2 layers of foam squares were used to add varying levels of dimension. I was careful to keep the center clean and simple and preserve the appearance of the teal ring around the center.
I foam mounted the wreath to a 12 x 12 piece of scrapbook fabric and framed in a 12 x 12 shadow box frame. The frame was 1 ” deep to accommodate for the dimensional flowers.

All that was left was to create a matching tag. A stitched tag die was used to cut 1 piece of white and teal cardstock. The Altenew Halftone Circles Nesting Die Set was used to cut out a circle from the center.
The hand penned sentiment is a nod to Altenew and all the instructors whose classes I’ve taken through Altenew Academy. I’ve learned so much from them all and am so greatful they’ve helped me hone my craft!!
Thanks so much for stopping by. Breathe · Ink · Inspire
Supplies


I am amazed at the artistry and details of your shadow box project! I love that you were inspired by your blog name and design! GREAT choice of burlap in the background, too! Your write-up is excellent!! Way to ace this challenge, Amber! I thoroughly enjoy seeing your beautiful progression in AECP!
Beautiful project! I liked video instructions too.