Create Dramatic Dimension With Zentangle, Watercolor, & Embossing
Create dramatic dimension on your cards with layers of Zentangle, watercolor, and heat embossing. It’s all about layers for this eye-catching technique.

Learn how to create dramatic dimension on one-layer cards with Zentangle, watercolor, & embossing in this short cardmaking video tutorial. Watch here or in HD on YouTube. While you’re there, we’d love it if you like, subscribe, and share it with friends.
Layer 1: Stencil + Watercolor
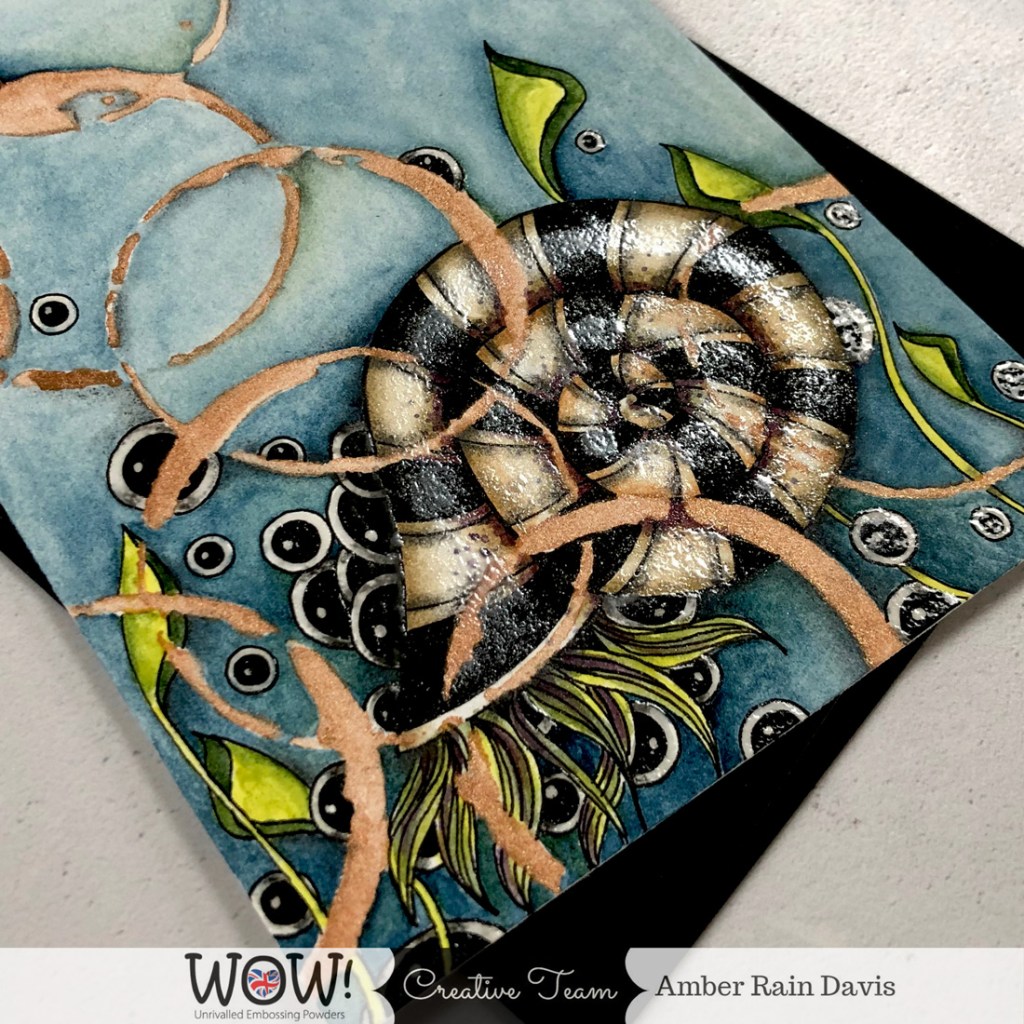
his month WOW! Monthly Challenge theme on the Facebook Fan page is masculine cards. With that in mind, I sprayed a bit of Pixie Spray onto the back of the Coffee Cup Rings Stencil from StencilGirl Products and temporarily adhered it to a piece of Saunders Waterford High White Hot Press paper.
Next, I painted the coffee cup rings with bronze handmade watercolor from Letter Sparrow. If you don’t have a stencil like this, simply dip a real coffee or teacup and dip it into coffee, tea, or watercolor and press it onto the watercolor paper. This works like a charm!
Layer 2: Zentangle® Ocean Scene
Now I know this seems complicated, but each Zentangle® is broken down into simple steps. This Zentangle® ocean scene consists of four Zentangle® patterns: Marasu, Caviar, Dionaea, and Enyshou.
Dionaea Step-Out
Dionaea is my own pattern, so named becuase it reminded me of carnivorous plants. Play around with changing the shape from angular to more rounded for different looks.

The step-out for Enyshou, by Zentangle, Inc, has not been released to the public. However, I do share how to draw this pattern in the video, so be sure to check it out. For additional instruction regarding Marasu and Caviar click their links.
Layer 3: Watercolor
After the tangling is complete it’s time to watercolor the tangled images and background. Here I chose Letter Sparrow handmade watercolors, but of course, use your favorite set.
I encourage you to layer colors for greater depth. If you’re using color straight out of the pan or tube, consider mixing more than one color on the page for added interest. And be sure to add deep dark color in the nooks and crannies to add shadow.
LETTER SPARROW WATERCOLOR
Coffee Cup Rings Stencil | Bronze
Water | Mayan Turquoise, Nitroso Green
Marasu (snail shell) | Orange Ochre, Antica Green, Italian Violet
Enyshou (snail tentacles) | Mayan Yellow, Italian Violet, Emerald Green
Dionaea |Mayan Yellow, Nitroso Green

Layer 4: Heat Embossing
Of course we need heat embossing to add a layer of shine and texture. I colored Caviar, the black and white orbs, with a WOW! Embossing Pen and heat embossed with Clear Gloss Embossing Powder.
Next, I applied embossing gel to my glass mat with the WOW! Mixed Media Embossing Brush. I picked up the gel with my finger and dabbed it on the highlighted area of the Marasu snail shell. Next, I sprinkled on White Pearl Embossing Powder and melted it with the Dual Speed Heat Tool.
Dabbing the gel on and heat embossing with White Pearl added the perfect distressed texture to this underwater creature.

Layer 5: Graphite Shading
Graphite shading adds the final layer of dimension to this one-layer card. Use a regular pencil to lay down a bit of graphite in the nooks and crannies where objects overlap. Finally, blend the graphite with a tortillon, and this lovely is done.
I should note, this isn’t a regular everyday card for me. This one was special. I don’t normally spend this amount of time on a card. As soon as I started drawing an ocean scene, I knew I would frame it for my middle daughter. Her birthday was the next day and we had just redecorated her room with an ocean theme. She thought it was “magnificent” and I hope you do too.
I hope you’re inspired to try Zentangle for Cardmakers, but if not, you can definitely apply layers of dimension like these to your stamped images, cards, and scrapbooking projects. Thanks for joining me today! I’d love to know what you think so leave a comment here or on YouTube.

Zentangle & Copics On Metallic Cardstock
This loose watercolor background is actually printed on metallic cardstock.
Check out this post/video to learn how!
Pin It
If you love it, pin it, and share it with your crafty friends! Visit me on Pinterest for more design inspiration, patterns, and color combinations.

Supplies
If you fancy supporting my blog and YouTube channel, please use these compensated affiliate links at no cost to you. I earn a small commission from qualifying purchases. Thank you for your support which helps me host my blog and bring you new content!


Oh wow, Amber!! You are singing my song with this card!! This is the type of art that I just LOVE to do!! Watercolor and Zentangle TOGETHER…..two of my faves!! I am new to your page, but cant wait to EXPLORE all of your crafty goodness! Simply lovely!! Thanks for the inspiration for my art love!!!
I watched the video and agree with your daughter, this piece is marvelous. I am so excited to see the combining of watercolor with pen and ink as well as the embossing. I’ve been looking for something new to try and this is it! Thanks for sharing and am now subscribed to your youtube channel as well.
This is great! Thank you for sharing everything!
Really like the scene created. Great video on the process. I think it was a great use of the powder to add the shine. Looks really great when the light hits it. Have seen the brushes a few times now and would like to try them out.